이번 강의에서는 한 Activity에서 Fragment라는 조각의 뷰만 교체하는 방식을 구현하는 법을 알아볼 거다. 카톡같은 곳에서 친구, 채팅 등과 같은 것이 바로 Fragment를 사용한 부분이다.
https://www.youtube.com/watch?v=3Th96mVEpyo&list=PLC51MBz7PMyyyR2l4gGBMFMMUfYmBkZxm&index=14
(1) activity_main.xml
<?xml version="1.0" encoding="utf-8"?>
<RelativeLayout xmlns:android="http://schemas.android.com/apk/res/android"
    xmlns:app="http://schemas.android.com/apk/res-auto"
    xmlns:tools="http://schemas.android.com/tools"
    android:layout_width="match_parent"
    android:layout_height="match_parent"
    tools:context=".MainActivity">

    <FrameLayout
        android:id="@+id/frame"
        android:layout_width="match_parent"
        android:layout_height="match_parent"></FrameLayout>

    <LinearLayout
        android:layout_width="match_parent"
        android:layout_height="50dp"
        android:layout_alignParentBottom="true">

        <Button
            android:id="@+id/btn1"
            android:layout_width="wrap_content"
            android:layout_height="wrap_content"
            android:layout_weight="1"
            android:text="메뉴1"/>

        <Button
            android:id="@+id/btn2"
            android:layout_width="wrap_content"
            android:layout_height="wrap_content"
            android:layout_weight="1"
            android:text="메뉴2"/>

        <Button
            android:id="@+id/btn3"
            android:layout_width="wrap_content"
            android:layout_height="wrap_content"
            android:layout_weight="1"
            android:text="메뉴3"/>

        <Button
            android:id="@+id/btn4"
            android:layout_width="wrap_content"
            android:layout_height="wrap_content"
            android:layout_weight="1"
            android:text="메뉴4"/>


    </LinearLayout>

</RelativeLayout>● Framelayout을 통해 activity_main에서 Fragment를 띄울 수 있다.
+) Framelayout 자식(Children)으로 추가된 여러 뷰(View) 위젯들 중 하나를 Layout의 전면에 표시할 때 사용하는 클래스이다.
참고 : https://recipes4dev.tistory.com/127
● LinearLayout의 allignParentBottom을 통해서 LinearLayout 안의 위젯을 밑에 고정시킬 수 있다.
● LinearLayout 안의 버튼을 이용해 Fragment 뷰로 교체시킬 것이다.
(2) Fragment layout 만들기
<?xml version="1.0" encoding="utf-8"?>
<FrameLayout
    xmlns:android="http://schemas.android.com/apk/res/android"
    android:layout_width="match_parent"
    android:layout_height="match_parent">

    <TextView
        android:textSize="30sp"
        android:layout_width="wrap_content"
        android:layout_height="wrap_content"
        android:text="1번 framgment"/>

</FrameLayout>● layout 폴더 안에 fragment xml을 만들어 fagment 뷰를 꾸밀 수 있다.
● FrameLayout을 마찬가지로 사용해준다.
+) 강의에서는 4개의 버튼으로 4개의 Fragment를 만들어줬기에 fagment xml파일 또한 4개 만들어줬다.
(3) Fragment 부분 java
package com.example.fragmentexample;

import android.os.Bundle;
import android.view.LayoutInflater;
import android.view.View;
import android.view.ViewGroup;

import androidx.annotation.Nullable;
import androidx.fragment.app.Fragment;

public class Fragment1 extends Fragment {

    public Fragment1() {

    }

    @Nullable
    @Override
    public View onCreateView(LayoutInflater inflater, @Nullable ViewGroup container, Bundle savedInstanceState) {
        return inflater.inflate(R.layout.fragment1, container, false);
    }
}● 맨처음엔 public class Fragment 만 존재할텐데 이때 extends Fragment(androidx.fragment.app)을 추가해준다.
● Fragment1() {} 은 Fragment 상속시 자동으로 추가되나보다.
● oncreateView는 inflate를 위한 메소드이다. 때문에 return되는 inflate값인 fragment1을 인플레이션을 통해 참조한다.
+) inflate는 xml의 레이아웃을 메모리에 객체화하여 java부분에서 코딩할 때 사용할 수 있게끔하는 동작이다.
xml파일과 마찬가지로 4개 만들어준다.
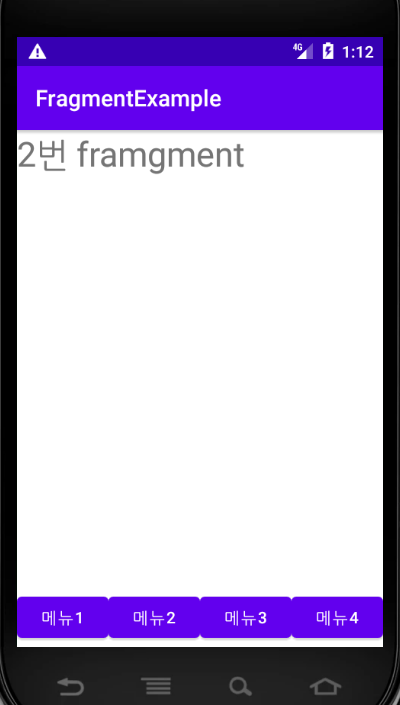
(4) MainActivity.java 에서 버튼을 이용해 Fragment 띄우기
package com.example.fragmentexample;

import androidx.appcompat.app.AppCompatActivity;
import androidx.fragment.app.Fragment;
import androidx.fragment.app.FragmentTransaction;

import android.os.Bundle;
import android.view.View;
import android.widget.Button;

public class MainActivity extends AppCompatActivity {

    Button btn1,btn2,btn3,btn4;

    @Override
    protected void onCreate(Bundle savedInstanceState) {
        super.onCreate(savedInstanceState);
        setContentView(R.layout.activity_main);

        btn1 = (Button)findViewById(R.id.btn1);
        btn2 = (Button)findViewById(R.id.btn2);
        btn3 = (Button)findViewById(R.id.btn3);
        btn4 = (Button)findViewById(R.id.btn4);

        btn1.setOnClickListener(new View.OnClickListener() {
            @Override
            public void onClick(View v) {
                FragmentTransaction transaction = getSupportFragmentManager().beginTransaction();
                Fragment1 fragment1 = new Fragment1();
                transaction.replace(R.id.frame, fragment1);
                transaction.commit();
            }
        });

        btn2.setOnClickListener(new View.OnClickListener() {
            @Override
            public void onClick(View v) {
                FragmentTransaction transaction = getSupportFragmentManager().beginTransaction();
                Fragment2 fragment2 = new Fragment2();
                transaction.replace(R.id.frame, fragment2);

                transaction.commit();
            }
        });

        btn3.setOnClickListener(new View.OnClickListener() {
            @Override
            public void onClick(View v) {
                FragmentTransaction transaction = getSupportFragmentManager().beginTransaction();
                Fragment3 fragment3 = new Fragment3();
                transaction.replace(R.id.frame, fragment3);

                transaction.commit();
            }
        });

        btn4.setOnClickListener(new View.OnClickListener() {
            @Override
            public void onClick(View v) {
                FragmentTransaction transaction = getSupportFragmentManager().beginTransaction();
                Fragment4 fragment4 = new Fragment4();
                transaction.replace(R.id.frame, fragment4);

                transaction.commit();
            }
        });


    }
}● 설정한 버튼변수에 setOnclickListener 메소드를 추가해 클릭하면 아래의 코드가 수행되게끔 해준다.
● FragmentTransaction을 통해 Fragment 변환이 일어나게 해주고, getSupportFragmentManager FragmentManager을 반환해준다. FragmentManager은 액티비니 매니저와 같은 역할을 하고 Fragment를 다루는 작업을 해주는 객체로 프래그먼트 추가,삭제 또는 교체 등의 작업을 할 수 있게 해준다.
● beginTransaction()은 FragmentManager가 Fragment를 바꿀 때 오류가 생기면 다시 원상태로 돌릴 수 있게 해준다.
● Fragment4 fragment4 = new Fragment4();를 통해 클래스를 생성해준다.
● replace()함수를 이용해 실행시킬 fragment를 입력해준다.
● commit()함수를 이용해 transaction이 완료되면 fragment를 띄운다.

'study & bootcamp > 안드로이드 앱 스터디' 카테고리의 다른 글
| Android App 개발 스터디 #12 RecyclerView편 및 RecyclerView 입력 글자가 표시되도록 바꾸어보기 (0) | 2021.08.04 |
|---|---|
| Android App 개발 스터디 #14 Log출력 및 주석 다는 법 (0) | 2021.08.04 |
| Android App 개발 스터디 #10 Navigation Menu 커스텀 편 (0) | 2021.07.21 |
| Android App 개발 스터디 #9 WebView (0) | 2021.07.21 |
| Android App 개발 스터디 #8 SharedPreferences (0) | 2021.07.20 |